
Drywall Repair
Contact Us

You might find yourself staring at your home’s damaged ceilings and walls. Most homes have drywall that requires drywall repair. Also known as Sheetrock, it covers the interior. Although drywall can be durable to a certain extent, it is susceptible to cracks and holes. This is especially true if pets or toddlers are running around.
Most drywall damage can usually be repaired quickly and easily. You only need essential tools and suitable materials. This DIY guide will walk you through how to fix drywall. It covers everything from doorknob damage to cracks under windows to sagging ceilings. But first, let’s talk about safety precautions.
Safety Tips for Drywall Repair
Lift carefully. It is best to purchase full sheets of drywall measuring 4×8 feet. Then, you can cut them to size as necessary. A full sheet of 1/2-inch standard drywall weighs in at 54 pounds.
Drywall sheets can be challenging to lift and transport, so avoid straining your back. Always work with Wellington Pro Painters & Popcorn Removal to make your repair successful. Be careful when balancing drywall sheets against other things. A sheet that falls over could cause serious injury to someone, especially a child or pet.
Warning! Premixed joint compounds come in different sizes, which can be helpful for use around your home and yard. Toddlers are at risk from five-gallon buckets. The buckets are just right in height, so small children can fall over the edge and become trapped. Even if the bucket holds only a few inches of water, it should always be kept close at hand if you are using the bucket to carry water. Don’t leave buckets outside where rainwater can collect, as this could lead to drowning.
You can prevent your child from drowning using buckets to carry tools and gardening supplies.
Get rid of all the dust. To repair drywall, you will need to sand the joint compound. This is necessary to create a smooth, unblemished surface. Joint compound dust can cause respiratory irritation due to its high concentrations of silica and gypsum. To protect your lungs, wear a dust mask when sanding joint compounds.
A drop cloth can also cover the area you are sanding. After sanding the floor, wipe off the dust with a damp sponge. Finally, clean any surrounding areas with a shop vacuum with a HEPA filter. After the dust has settled, vacuum. This is because most vacuums cannot capture fine sanding dust and can only blow it back into your air.
Premixed drywall compounds are also known as spackle. They come in two main types: lightweight and all-purpose. Light products weigh about one-third less than all-purpose and dry faster. It also takes less time to sand smooth. The all-purpose compound is more expensive and dries more quickly.
Both are simple to use and can be stored at room temperature for approximately nine months. A five-gallon bucket can be used to repair drywall damage in multiple rooms. This will work for more minor repairs.
Dry-mix joint compound, also available in powder form, is also readily available. Before applying, it must be mixed with enough water. Pre-mixed blends are more expensive than dry-mixed, but they are easier to use and faster for DIY repairs.

Doorknob Damage
Apply joint compound to the patch using a drywall knife measuring four or six inches. Apply enough pressure to push the combination through the mesh. After the mixture has dried, sand lightly. Apply a second coat of compound. Make sure you extend the second coat a few inches beyond your first. Continue the process for the third and final time. After drying, lightly sand and then prime. Step 2
Crumpled Corner Bead
Remove the corner bead using a straight-blade screwdriver and a thin pry bar. You should not damage surrounding drywall surfaces. Use an aviation snip to trim a new corner bead to replace damaged sections. Place the new piece and attach it using a 1 1/2-inch-long drywall nail. These nails have flat heads with fragile heads, making them easier to hide with joint compounds. Apply two- to three coats of joint compound. Sand between coats. Use an 8-inch drywall knife to spread the final coat. Prime and paint the walls once you are done. Step 2
Step 3
Step 4
Creeping Cracks
Step 1
You will see vertical drywall cracks above and below your doors and windows. These cracks can be caused by shrinkage of lumber and settling within the house frame. Use a sanding sponge or sandpaper to smoothen the cracks. To remove any dust or debris, vacuum the crack.
Step 2
Next, use a narrow knife to apply a thin layer of joint compound to the crack. Let it dry before sanding it. Apply a second thin layer.
Step 3
Spray the repair with a thin layer of elastic crack cover-up such as Good-Bye cracks to prevent the gap from reappearing.
Nails That Go Pop
Step 1
Lumber shrinkage can also cause nail and screw pops. To repair a popped nail or screw, first, twist the tip of a utility blade into the wall to remove the joint compound.
Step 2
Use your screwdriver to tighten it, pushing it down below the surface. To tap in the nail more profound, you can use a hammer or a nail set to pop it. You can pull it out with pliers if it doesn’t feel like the pin is hitting solid wood.
Step 3
Use a drywall knife and apply three thin coats of lightweight joint compound to the repaired area. After sanding, prime and paint.
Ceilings with textured surfaces
Step 1
Although water damage can stain drywall ceilings, in extreme cases, the drywall may sag from the joists. This can be a complicated repair for a ceiling with a texture. To remove any surface or smoothen the area, use a hand-sanding tool equipped with a screen.
Step 2
Next, press the drywall against the joist and secure it along its seam with drywall nails.
Step 3
Water stains can often bleed through standard primer. Apply a primer specifically designed to block the most stubborn stains.
Step 4
Use a thick-nap roll to blend the repair area with the surrounding texture ceiling. Apply a thick mixture, thinned with water, of drywall compound.
Step 5
Apply texture to the ceiling using a short-handled brush before the thinned compound drys. You can conceal popcorn texture on ceilings with a spray bottle if they have popcorn texture.
Loose inside-Corner Tape
Step 1
The seams between sheets of drywall are covered with paper drywall tape. There are also thin layers of joint compounds. Sometimes, the paper tape can pull away and tear, especially in bathrooms frequently exposed to moist, hot air. This problem is often found in the corners of walls.
Although it may seem tempting to glue the tape down, it is best to use a utility knife to remove and replace it with a piece of tape. Apply a thin layer of drywall compound to each corner after removing the tape.
Step 2
Next, cut a piece of paper tape to the desired length. Fold it along its center fold and press it into the wet joint compound.
Step 3
You can apply the tape to the compound with a 4-inch knife. However, an inside-corner knife is much more efficient. This particular tool smoothes both the outside and inside corners simultaneously.
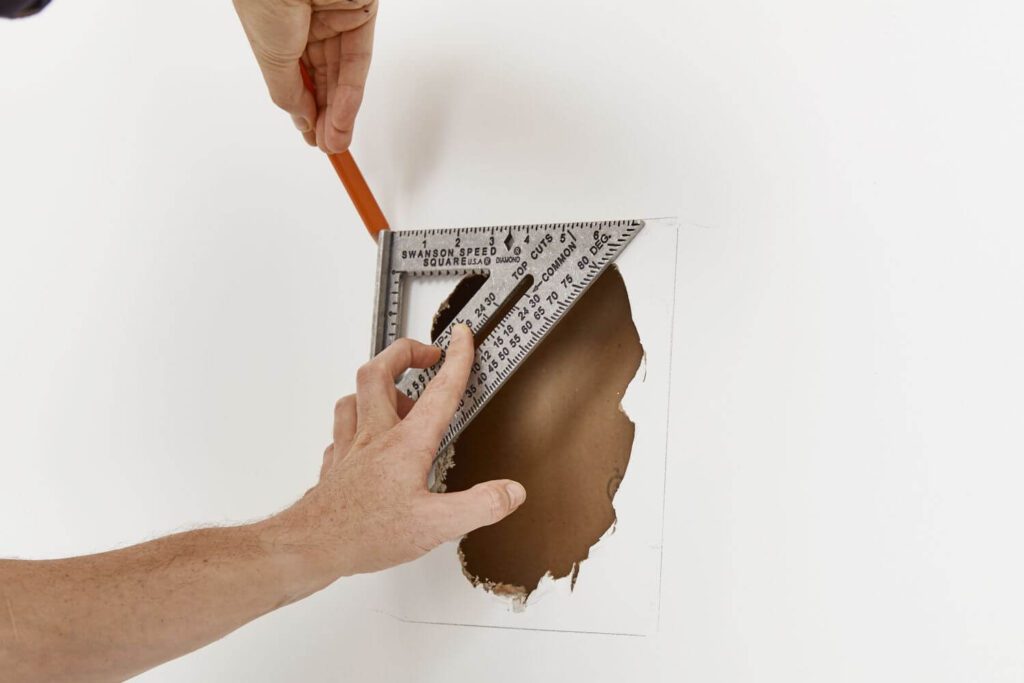
Patching large holes
Step 1
First, use a 24-inch ruler to draw a line around the hole. Removing the four lines, ensure one vertical bar is centered on the wall stud.
Step 2
Use a drywall saw to cut three sides. This is sometimes called a jab saw because the saw’s pointed tip cuts through the drywall. To prevent debris from falling into the wall cavity, lift it off as you cut.
Step 3
Use a utility knife or a razor to remove the drywall from the outline.
Step 4
Measure a 1-by-4 foot pine board that is six to eight inches wider than the opening in the wall. Apply some construction adhesive to the ends of your board.
Step 5
Insert the one-by-4 into the hole, with the glued surface facing back. Place the board in the hole to extend at least 1 1/2 inches. Two clamps are required to secure the board.
Step 6
Once the adhesive has dried, cut a piece of drywall to fit loosely into the hole. Apply construction adhesive to the surface of the one-by-four. Once the glue has dried, press the patch into the hole and attach it to the stud with 1 1/4-inch drywall screws.
Step 7
Use a dampened sponge to clean the wall and patch of drywall. Apply adhesive-backed fiberglass mesh tape to the four seams. For maximum strength, overlap the tape at the corners and place each piece directly above a seam. For good adhesion, press the tape down.
Step 8
Apply the first layer of joint compound to the tape using a 4-inch drywall knife. Let the mixture dry overnight.
Step 9
Smoothen the dry compound using a hand-sanding mat fitted with a screen.
Step 10
Using an 8-inch knife, apply several skim coats (each slightly larger than the previous) of joint compound to the repair. Use 220-grit sandpaper to smoothen the last coat. Apply primer and then paint two coats. Sometimes, it may be necessary to paint the whole wall to hide the patch.
Locations We Serve
We offer the above services at the following locations within Wellington:
Additional HOAs We Service
If you are located in Palm Beach County and you don’t see your city/area listed above, don’t worry! We cover all of Palm Beach County. Fill out the contact form above or CLICK HERE and send us a message. We’ll get back to you asap!
Here is a list of our services you can get at Wellington Pro Painters & Popcorn Removal:
-
Commercial Painting Near Me
-
Commercial Popcorn Removal Near Me
-
Drywall Repair Near Me
-
Drywall Installation Near Me
-
Knockdown Texture Near Me
-
Orange Peel Ceilings Near Me
-
Residential Painting Near Me
-
Residential Popcorn Removal Near Me
-
Smooth Ceiling Finish Near Me
-
Commercial Painting Services
-
Commercial Popcorn Removal Services
-
Drywall Repair Services
-
Drywall Installation Services
-
Knockdown Texture Services
-
Orange Peel Ceilings Services
-
Residential Painting Services
-
Residential Popcorn Removal Services
-
Smooth Ceiling Finish Services
-
Commercial Stucco Installation Near Me
-
Complete EIFS Reinstallation Near Me
-
Custom Stucco and Texturing Near Me
-
Denglass Framing Near Me
-
EIFS Inspection Near Me
-
EIFS Installation Near Me
-
EIFS Wall Systems Near Me
-
Exterior Kitchen Stucco Near Me
-
New Construction Stucco Near Me
-
Stucco Application Near Me
-
Commercial Stucco Installation Services
-
Complete EIFS Reinstallation Services
-
Custom Stucco and Texturing Services
-
Denglass Framing Services
-
EIFS Inspection Services
-
EIFS Installation Services
-
EIFS Wall Systems Services
-
Exterior Kitchen Stucco Services
-
New Construction Stucco Services
-
Stucco Application Services